Monday, January 31, 2011

Homemade Pop Tarts


Homemade Pop Tarts
Adapted from King Arthur Flour

Pastry
2 cups (8 1/2 ounces) all-purpose flour
1 tablespoon sugar
1 teaspoon salt
1 cup (2 sticks or 8 ounces) unsalted butter, cut into pats
1 large egg
2 tablespoons (1 ounce) milk

1 additional large egg (to brush on pastry)

Cinnamon Filling (enough for 9 tarts)
1/2 cup (3 3/4 ounces) brown sugar
1 to 1 1/2 teaspoons ground cinnamon, to taste
4 teaspoons all-purpose flour
1 large egg, to brush on pastry before filling

Jam Filling
3/4 cup (8 ounces) jam
1 tablespoon cornstarch mixed with 1 tablespoon cold water

Alternate fillings: 9 tablespoons chocolate chips, 9 tablespoons Nutella or other chocolate-hazelnut paste or 9 tablespoons of a delight of your choice, such as salted caramel or a nut paste

To make cinnamon filling: Whisk together the sugar, cinnamon, and flour.

To make jam filling: Mix the jam with the cornstarch/water in a small saucepan. Bring the mixture to a boil, and simmer, stirring, for 2 minutes. Remove from the heat, and set aside to cool. Use to fill the pastry tarts.

Make the dough: Whisk together the flour, sugar, and salt. Work in the butter with your fingers, pastry blender or food processor until pea-sized lumps of butter are still visible, and the mixture holds together when you squeeze it. If you’ve used a food processor, transfer the mixture to a large bowl. Whisk the first egg and milk together and stir them into the dough, mixing just until everything is cohesive, kneading briefly on a well-floured counter if necessary.

Divide the dough in half (approximately 8 1/4 ounces each), shape each half into a smooth rectangle, about 3×5 inches. You can roll this out immediately (see Warm Kitchen note below) or wrap each half in plastic and refrigerate for up to 2 days.

Assemble the tarts: If the dough has been chilled, remove it from the refrigerator and allow it to soften and become workable, about 15 to 30 minutes. Place one piece on a lightly floured work surface, and roll it into a rectangle about 1/8″ thick, large enough that you can trim it to an even 9″ x 12″. [You can use a 9" x 13" pan, laid on top, as guidance.] Repeat with the second piece of dough. Set trimmings aside. Cut each piece of dough into thirds – you’ll form nine 3″ x 4″ rectangles.

Beat the additional egg and brush it over the entire surface of the first dough. This will be the “inside” of the tart; the egg is to help glue the lid on. Place a heaping tablespoon of filling into the center of each rectangle, keeping a bare 1/2-inch perimeter around it. Place a second rectangle of dough atop the first, using your fingertips to press firmly around the pocket of filling, sealing the dough well on all sides. Press the tines of a fork all around the edge of the rectangle. Repeat with remaining tarts.

Gently place the tarts on a lightly greased or parchment-lined baking sheet. Prick the top of each tart multiple times with a fork; you want to make sure steam can escape, or the tarts will become billowy pillows rather than flat toaster pastries. Refrigerate the tarts (they don’t need to be covered) for 30 minutes, while you preheat your oven to 350°F.

Charming tip from King Arthur: Sprinkle the dough trimmings with cinnamon-sugar; these have nothing to do with your toaster pastries, but it’s a shame to discard them, and they make a wonderful snack. While the tarts are chilling, bake these trimmings for 13 to 15 minutes, till they’re golden brown.

Bake the tarts: Remove the tarts form the fridge, and bake them for 20 to 25 minutes, until they’re a light golden brown. Cool in pan on rack.

Whole Wheat Variation: I was itching to swap out 1/2 cup of the flour with whole wheat flour. I am sure it would make it more deliciously breakfast.

Pop Tart Minis: The biggest struggle I had with these was the size. I actually like my baked goods on the tiny size, thus I think this could make an adorable batch of 16 2 1/4″ x 3″ rectangles.

Savory Pop Tarts: Nix the sugar in the dough and halve the salt. Fill with pesto, cheese, ground nuts or olives, or any combination thereof. Brush the tops with additional egg wash and sprinkle with poppy or sesame seeds. Please invite me over.

Do ahead: The sweet versions should keep at room temperature in an airtight container for a week. If you’d like to make them further in advance, I vote for freezing them unbaked between layers of waxed paper, and baking them as you need.

From Smitten Kitchen

Notes from a Friend to Knit With:

I rolled them super thin. Seriously. Almost paper like. 3" x 4". Then, we put a B I G spoonful of the filling (Triple the recipe for the filling. You won't be sorry.) along one side and fold the piece in half. And then, after they cooled, drizzled brown sugar icing on top. Now THAT was the perfect little pop tart. Small, cinnamony and delicious.
{For the icing we melted 2 TBLS of butter and added 4 TBLS of milk and 1/3 cup of brown sugar. Mix well. Add 1 1/4 cup powdered sugar and 1/2 tsp of vanilla. Mix until smooth.}

Wednesday, January 19, 2011

Oven-Baked Bacon √


Sonya's Note: PERFECT way to prepare bacon! I'll be doing it this way from now on!

Difficulty:
Easy
Time Required: 20 minutes

Here's How:

  1. Line a baking sheet with foil. This will make cleanup easier later.
  2. Arrange bacon slices on the foil and place the baking sheet on the center rack of a cold oven. Close oven door. Turn oven on to 400°F. Walk away.
  3. Come back 17 to 20 minutes later. As soon as the bacon is golden brown, but not excessively crisp, it's done. The exact time will depend on the thickness of the bacon slices, and also on how quickly your oven reaches the target temperature.
  4. Remove the pan from the oven. Transfer the bacon to another sheet pan lined with paper towels to absorb the fat. You can pour the liquid fat into a heat-resistant container to save for other uses.

Tips:

  1. Don't pre-heat the oven! Make sure the oven is cold when you put the bacon in.
  2. Keep your eye on the bacon during the final few minutes of cooking to make sure that it doesn't burn. Also, remove the cooked bacon from the hot pan right away. The heat from the pan and the hot bacon fat will continue cooking the bacon.
  3. You can slightly undercook the bacon, then cool it and freeze it in a zipper bag. Then, to reheat, cook two slices in the microwave on medium power for 30 seconds or so.
  4. Variation: Dredge bacon in flour or corn meal before baking.
  5. Variation: Sprinkle bacon with brown sugar or freshly ground black pepper before baking.

What You Need:

  • 1 lb package of bacon
  • Oven
  • Shallow baking sheet
  • Aluminum foil and paper towels
  • Heat-resistant container for collecting drippings

Wednesday, December 8, 2010

Thai Cucumber Salad w/ Chicken

Thai Cucumber Salad w/ Chicken

Salad dressing:

7 T. seasoned rice vinegar

2 T. water

1 tsp. ground chili paste

(I add 2 - 4 pkgs of Splenda to this dressing.)

Salad:

2 English cucumbers, peeled & halved lengthwise, sliced thin

1/2 sm. yellow onion, thinly sliced (I use Walla Walla sweets)

2 Roma tomatoes, halved, seeded, thinly sliced

10 fresh mint leaves

6 sprigs fresh cilantro, chopped

2 T. roasted peanuts, chopped, for garnish (I don't use - bleh, peanuts!)

Combine dressing ingredients in a bowl, toss. Set aside for 15 min. Top w/ peanuts if desired. Serves 4.

Chicken:

1/2 chicken breast

1 T. fish sauce

1/2 tsp. chili paste

2 T. canola oil

2 pkg Splenda

1/4 tsp. garlic powder

Cut chicken breast in 1/2 lengthwise and then in strips. Put all ingredients in large zip bag and mix together, add chicken and marinate 15 - 20 min. Cook on bbq grill til done. Serve w/ cucumber salad. Add more roma tomatoes if desired.

Does this recipe sound weird to you? Don't think it is... give it a try. Remember - my kids give it a 9 out of 10 w/ 10 being the best. :)

Sunday, October 17, 2010

Street Corn


Street Corn


From the episode: Supper From South of the Border

Serves 6

If you can find queso fresco or Cotija, use either in place of the Pecorino Romano.

Ingredients
  • Vegetable oil for cooking grate
  • 1/4 cup regular or light mayonnaise
  • 3 tablespoons sour cream
  • 3 tablespoons minced fresh cilantro leaves
  • 1 medium garlic clove , minced or pressed through garlic press (about 1 teaspoon)
  • 3/4 teaspoon chili powder
  • 1/4 teaspoon ground black pepper
  • 1/4 teaspoon cayenne pepper (optional)
  • 4 teaspoons juice from 1 lime
  • 1 ounce Pecorino Romano cheese , grated (about 1/2 cup) (see note)
  • 4 teaspoons vegetable oil
  • 1/2 teaspoon kosher salt or 1/4 teaspoon table salt
  • 6 large ears corn , husks and silk removed
Instructions
  • 1. Light large chimney starter filled with charcoal (6 quarts, about 100 briquettes) and allow to burn until coals are fully ignited and partially covered with thin layer of ash, about 20 minutes. Arrange all coals in even layer over half of grill, leaving other half empty. Position cooking grate over coals, cover grill, and heat grate until hot, about 5 minutes; scrape grate clean with grill brush. Dip wad of paper towels in vegetable oil; holding wad with tongs, wipe cooking grate.
  • 2. While grill is heating, combine mayonnaise, sour cream, cilantro, garlic, 1/4 teaspoon chili powder, black pepper, cayenne (if using), lime juice, and cheese in large bowl; set aside. In second large bowl, combine oil, salt, and remaining 1/2 teaspoon chili powder; add corn and toss until coated evenly.
  • 3. Grill corn over coals, turning occasionally, until lightly charred on all sides, 7 to 12 minutes total. Remove from grill and place in bowl with mayonnaise mixture; toss to coat evenly. Serve immediately.
From America's Test Kitchen

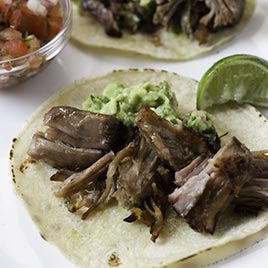
Mexican Pulled Pork (Carnitas)


Mexican Pulled Pork (Carnitas)


From the episode: Supper From South of the Border

Serves 6

We like serving carnitas spooned into tacos, but you can also use it as a filling for tamales, enchiladas, and burritos.

Ingredients
Pork
  • 1 (3 1/2-to 4-pound) boneless pork butt , fat cap trimmed to 1/8 inch thick, cut into 2-inch chunks
  • 1 teaspoon ground cumin
  • 1 small onion , peeled and halved
  • 2 bay leaves
  • 1 teaspoon dried oregano
  • 2 tablespoons juice from 1 lime
  • 2 cups water
  • 1 medium orange , halved
Tortillas and Garnishes
  • 18 (6-inch) corn tortillas , warmed
  • Lime wedges
  • Minced white or red onion
  • Fresh cilantro leaves
  • Thinly sliced radishes
  • Sour cream
Instructions
  • 1. Adjust oven rack to lower-middle position and heat oven to 300 degrees. Combine pork, 1 teaspoon salt, 1/2 teaspoon pepper, cumin, onion, bay leaves, oregano, lime juice, and water in large Dutch oven (liquid should just barely cover meat). Juice orange into medium bowl and remove any seeds (you should have about 1/3 cup juice). Add juice and spent orange halves to pot. Bring mixture to simmer over medium-high heat, stirring occasionally. Cover pot and transfer to oven; cook until meat is soft and falls apart when prodded with fork, about 2 hours, flipping pieces of meat once during cooking.
  • 2. Remove pot from oven and turn oven to broil. Using slotted spoon, transfer pork to bowl; remove orange halves, onion, and bay leaves from cooking liquid and discard (do not skim fat from liquid). Place pot over high heat (use caution, as handles will be very hot) and simmer liquid, stirring frequently, until thick and syrupy (heatsafe spatula should leave wide trail when dragged through glaze), 8 to 12 minutes. You should have about 1 cup reduced liquid.
  • 3. Using 2 forks, pull each piece of pork in half. Fold in reduced liquid; season with salt and pepper to taste. Spread pork in even layer on wire rack set inside rimmed baking sheet or on broiler pan (meat should cover almost entire surface of rack or broiler pan). Place baking sheet on lower-middle rack and broil until top of meat is well browned (but not charred) and edges are slightly crisp, 5 to 8 minutes. Using wide metal spatula, flip pieces of meat and continue to broil until top is well browned and edges are slightly crisp, 5 to 8 minutes longer. Serve immediately with warm tortillas and garnishes.
From America's Test Kitchen

Saturday, September 4, 2010

Best French Onion Soup


Best French Onion Soup

From the episode: French Classics, Reimagined

Serves 6

Sweet onions, such as Vidalia or Walla Walla, will make this recipe overly sweet. Be patient when caramelizing the onions in step 2; the entire process takes 45 to 60 minutes. Use broiler-safe crocks and keep the rim of the bowls 4 to 5 inches from the heating element to obtain a proper gratinée of melted, bubbly cheese. If using ordinary soup bowls, sprinkle the toasted bread slices with Gruyère and return them to the broiler until the cheese melts, then float them on top of the soup. We prefer Swanson Certified Organic Free Range Chicken Broth and Pacific Beef Broth. For the best flavor, make the soup a day or 2 in advance. Alternatively, the onions can be prepared through step 1, cooled in the pot, and refrigerated for up to 3 days before proceeding with the recipe.

Ingredients
Soup
  • 3 tablespoons unsalted butter , cut into 3 pieces
  • 6 large yellow onions (about 4 pounds), halved and cut pole to pole into 1/4-inch-thick slices (see illustration below)
  • Table salt
  • 2 cups water , plus extra for deglazing
  • 1/2 cup dry sherry
  • 4 cups low-sodium chicken broth (see note)
  • 2 cups beef broth (see note)
  • 6 sprigs fresh thyme , tied with kitchen twine
  • 1 bay leaf
  • Ground black pepper
Cheese Croutons
  • 1 small baguette , cut into 1/2-inch slices
  • 8 ounces shredded Gruyère cheese (about 2 1/2 cups)
Instructions
1. For the soup: Adjust oven rack to lower-middle position and heat oven to 400 degrees. Generously spray inside of heavy-bottomed large (at least 7-quart) Dutch oven with nonstick cooking spray. Place butter in pot and add onions and 1 teaspoon salt. Cook, covered, 1 hour (onions will be moist and slightly reduced in volume). Remove pot from oven and stir onions, scraping bottom and sides of pot. Return pot to oven with lid slightly ajar and continue to cook until onions are very soft and golden brown, 1 1/2 to 1 3/4 hours longer, stirring onions and scraping bottom and sides of pot after 1 hour.
2. Carefully remove pot from oven and place over medium-high heat. Using oven mitts to handle pot, cook onions, stirring frequently and scraping bottom and sides of pot, until liquid evaporates and onions brown, 15 to 20 minutes, reducing heat to medium if onions are browning too quickly. Continue to cook, stirring frequently, until pot bottom is coated with dark crust, 6 to 8 minutes, adjusting heat as necessary. (Scrape any fond that collects on spoon back into onions.) Stir in 1/4 cup water, scraping pot bottom to loosen crust, and cook until water evaporates and pot bottom has formed another dark crust, 6 to 8 minutes. Repeat process of deglazing 2 or 3 more times, until onions are very dark brown. Stir in sherry and cook, stirring frequently, until sherry evaporates, about 5 minutes.
3. Stir in broths, 2 cups water, thyme, bay leaf, and 1/2 teaspoon salt, scraping up any final bits of browned crust on bottom and sides of pot. Increase heat to high and bring to simmer. Reduce heat to low, cover, and simmer 30 minutes. Remove and discard herbs, then season with salt and pepper.
4. For the croutons: While soup simmers, arrange baguette slices in single layer on baking sheet and bake in 400-degree oven until bread is dry, crisp, and golden at edges, about 10 minutes. Set aside.
5. To serve: Adjust oven rack 6 inches from broiler element and heat broiler. Set individual broiler-safe crocks on baking sheet and fill each with about 1 3/4 cups soup. Top each bowl with 1 or 2 baguette slices (do not overlap slices) and sprinkle evenly with Gruyère. Broil until cheese is melted and bubbly around edges, 3 to 5 minutes. Let cool 5 minutes before serving.

From America's Test Kitchen

French Chicken in a Pot √


French Chicken in a Pot

From the episode: French Classics, Reimagined
Total prep/cooking time, approximately 3 hours
Serves 4
The cooking times in the recipe are for a 4 1/2- to 5-pound bird. A 3 1/2- to 4 1/2-pound chicken will take about an hour to cook, and a 5- to 6-pound bird will take close to 2 hours. We developed this recipe to work with a 5- to 8-quart Dutch oven with a tight-fitting lid. If using a 5-quart pot, do not cook a chicken larger than 5 pounds. Use the best chicken available, such as a Bell & Evans. If using a kosher chicken, reduce the kosher salt to 1 teaspoon (or 1/2 teaspoon table salt). If you choose not to serve the skin with the chicken, simply remove it before carving. The amount of jus will vary depending on the size of the chicken; season it with about 1/4 teaspoon lemon juice for every 1/4 cup.
Ingredients
  • 1 whole roasting chicken (4 1/2 to 5 pounds), giblets removed and discarded, wings tucked under back (see note)
  • 2 teaspoons kosher salt or 1 teaspoon table salt
  • 1/4 teaspoon ground black pepper
  • 1 tablespoon olive oil
  • 1 small onion , chopped medium (about 1/2 cup)
  • 1 small stalk celery , chopped medium (about 1/4 cup)
  • 6 medium garlic cloves , peeled and trimmed
  • 1 bay leaf
  • 1 medium sprig fresh rosemary (optional)
  • 1/2 - 1 teaspoon juice from 1 lemon
Instructions
1. Adjust oven rack to lowest position and heat oven to 250 degrees. Pat chicken dry with paper towels and season with salt and pepper. Heat oil in large Dutch oven over medium heat until just smoking. Add chicken breast-side down; scatter onion, celery, garlic, bay leaf, and rosemary (if using) around chicken. Cook until breast is lightly browned, about 5 minutes. Using a wooden spoon inserted into cavity of bird, flip chicken breast-side up and cook until chicken and vegetables are well browned, 6 to 8 minutes. Remove Dutch oven from heat; place large sheet of foil over pot and cover tightly with lid. Transfer pot to oven and cook until instant-read thermometer registers 160 degrees when inserted in thickest part of breast and 175 degrees in thickest part of thigh, 80 to 110 minutes.

2. Transfer chicken to carving board, tent with foil, and rest 20 minutes. Meanwhile, strain chicken juices from pot through fine-mesh strainer into fat separator, pressing on solids to extract liquid; discard solids (you should have about 3/4 cup juices). Allow liquid to settle 5 minutes, then pour into saucepan and set over low heat. Carve chicken, adding any accumulated juices to saucepan. Stir lemon juice into jus to taste. Serve chicken, passing jus at table.


From America's Test Kitchen